55 Low Taper with Design Ideas: Back, Side & Freestyle Looks

Introduction
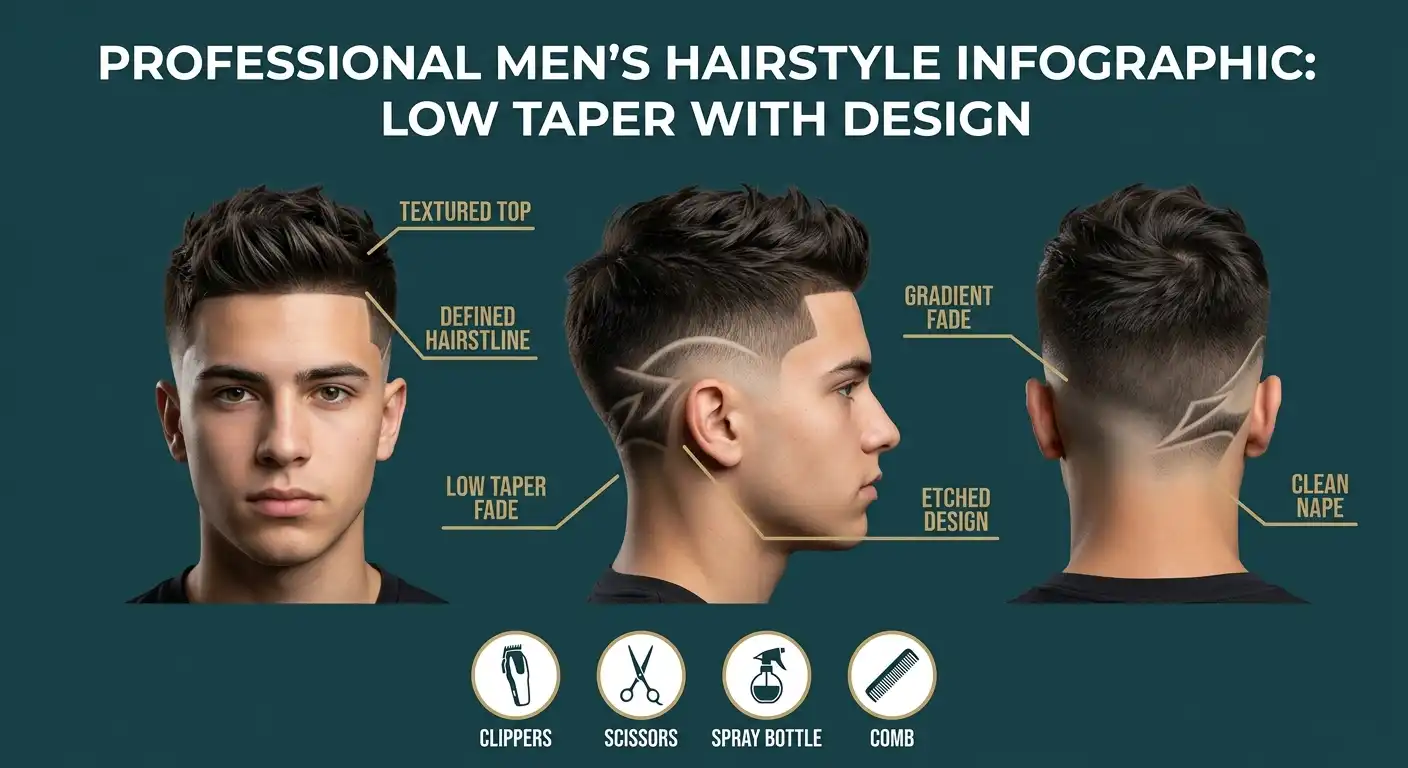
A low taper with design combines a low taper around the temples, ears, and neckline with a shaved or carved detail such as a line, curve, zigzag, geometric pattern, or freestyle shape. The taper keeps the haircut clean and wearable, while the design adds a personal edge.
The best choice depends on where you want the design, how bold you want it to look, your hair texture, and how often you can visit your barber. Below are 55 distinct ideas, followed by barber wording, guard guidance, styling advice, face-shape matching, and maintenance tips.
Quick Overview: 5 Styles to Consider First
| Style | Design Placement | Best For | Difficulty |
| Single Temple Line | Temple/side | First-time design | Easy |
| Double Back Lines | Back | Clean, sporty look | Moderate |
| Curved Side Design | Side | Wavy or straight hair | Moderate |
| Lightning Zigzag | Side/back | Bold personality | Moderate |
| Freestyle Nape Art | Back/neckline | Creative custom look | Advanced |
55 Low Taper Design Ideas
Simple Side & Temple Designs
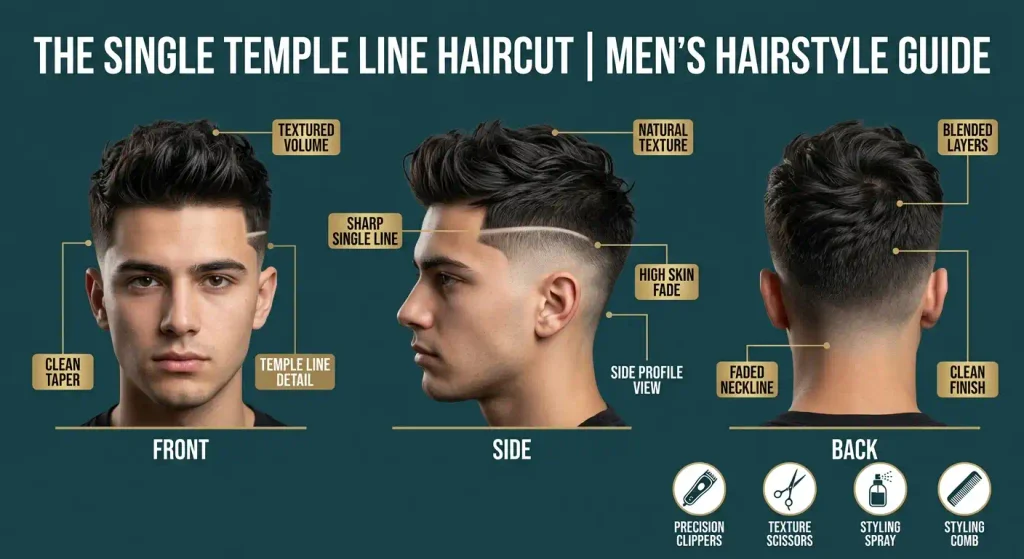
1. Single Temple Line: low taper with design
A single shaved line near the temple is the easiest starting point. Keep the low taper around a #0.5 to #2 range and let the line sit above the shortest area. Oval and square faces handle this clean detail especially well. Straight and wavy hair give the line a very crisp appearance, while curly hair creates stronger contrast. Ask your barber to keep the line narrow and clean rather than making it too deep. A small amount of matte clay on the longer hair keeps attention around the top without competing with the design.
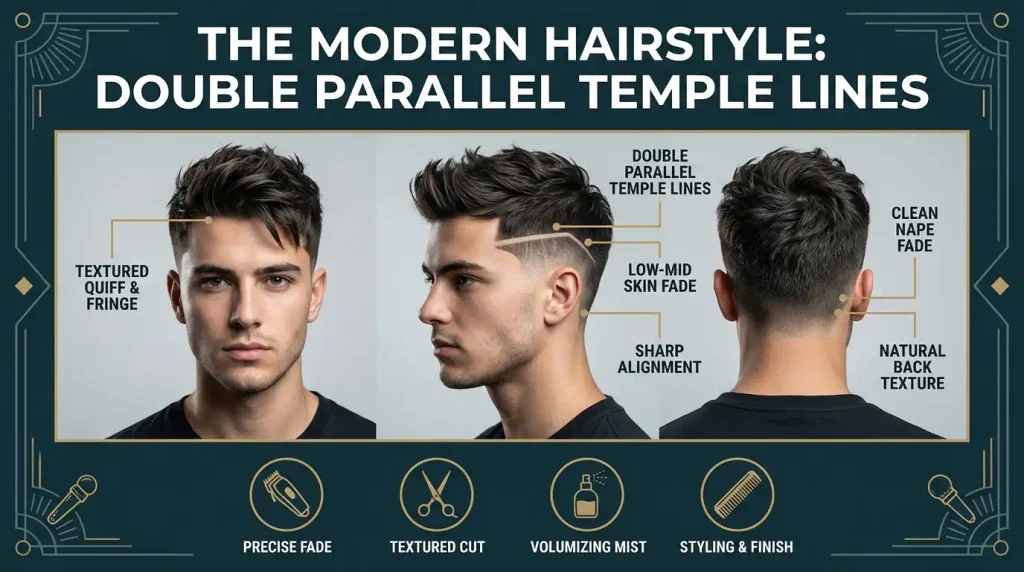
2. Double Parallel Temple Lines: low taper with design
Two parallel lines add more detail without becoming a full pattern. The barber can keep the taper low and use a trimmer or razor to create two clean channels. Medium and thick hair provide enough contrast for the lines to stand out. This option works particularly well with oval, square, and diamond face shapes. Keep the spacing balanced so the lines read as one design rather than random cuts. A matte clay or light styling paste works well when the top needs texture while the side remains sharp.
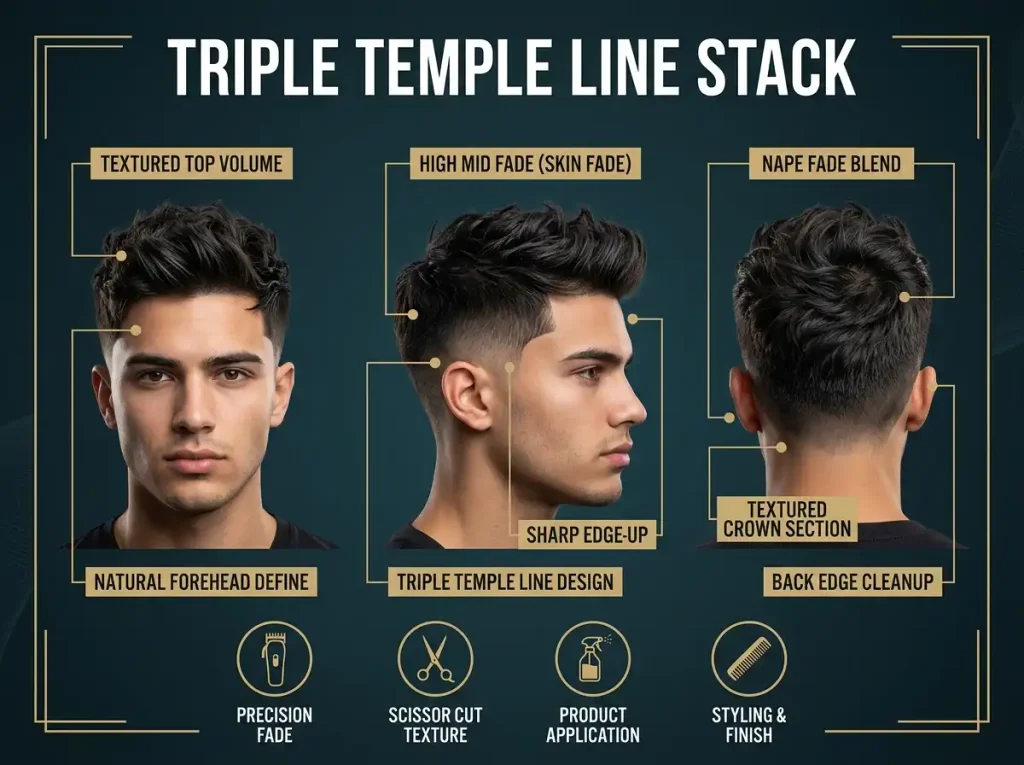
3. Triple Temple Line Stack: low taper with design
Three short lines create a stronger graphic effect. Because the design already has visual weight, the taper should stay controlled instead of climbing too high. Thick straight, wavy, or coily hair gives the best contrast. A #1 or #2 transition above the shortest taper area can help preserve some density. This design suits people who want something noticeable without covering a large section of the head. Keep the top relatively simple with a matte finish so the three-line detail remains the main feature.
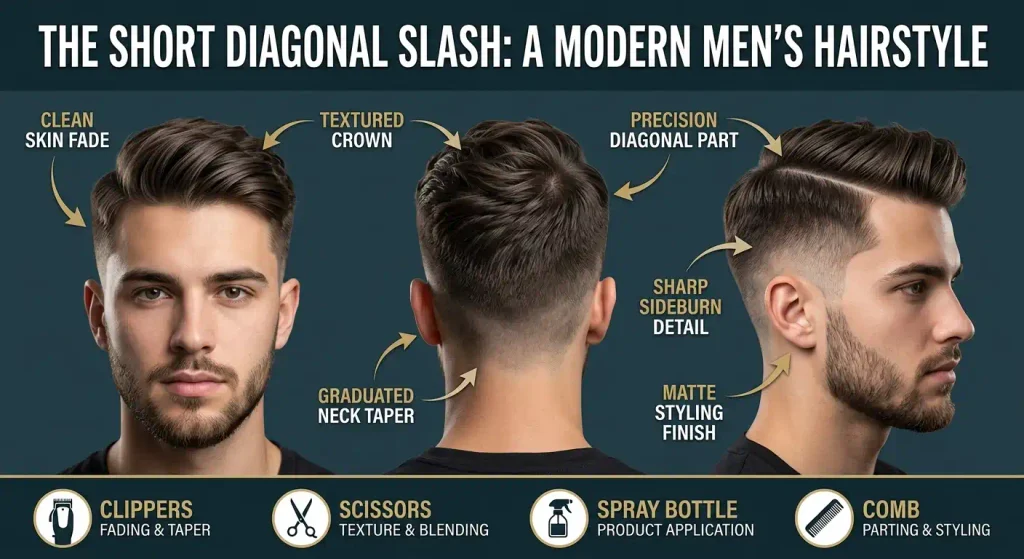
4. Short Diagonal Slash: low taper with design
A diagonal slash adds movement to a standard taper. Instead of running horizontally, the barber angles one clean line upward or downward near the temple. The direction can be adjusted to follow the head shape. It works on most hair textures, although dark and thick hair usually provides the clearest contrast. Round faces can benefit from the angled visual direction, while oval faces can wear it easily. Pair the cut with a textured top and a small amount of matte clay for a modern finish.
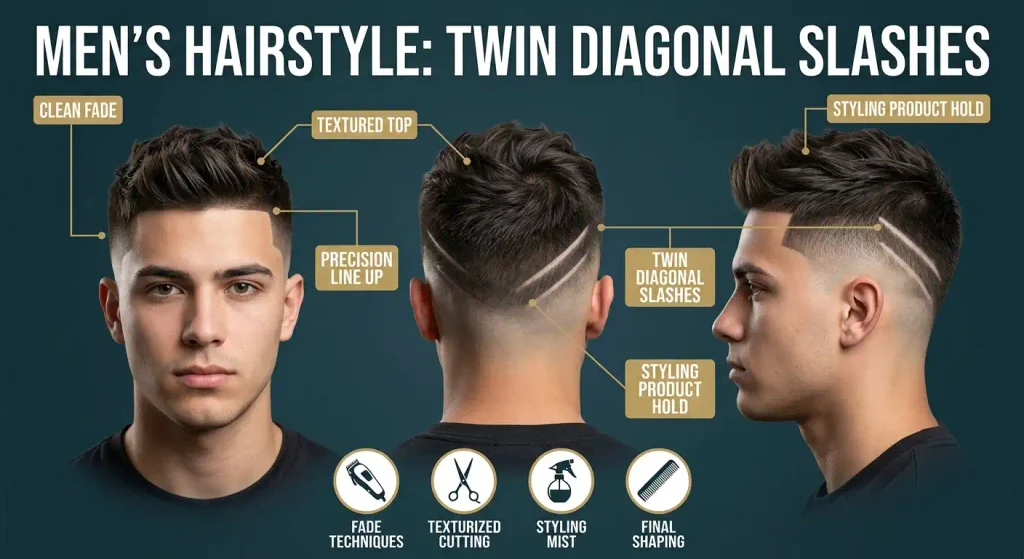
5. Twin Diagonal Slashes: low taper with design
Two diagonal slashes create a more energetic version of the basic line. The lines can run in the same direction or be slightly offset for a custom look. Keep enough hair between them so each mark remains visible as the cut grows. This style works well with straight, wavy, and curly hair. A low taper using a #0.5 through #2 transition keeps the sides clean without turning the haircut into a high fade. Finger styling with matte paste keeps the top relaxed.
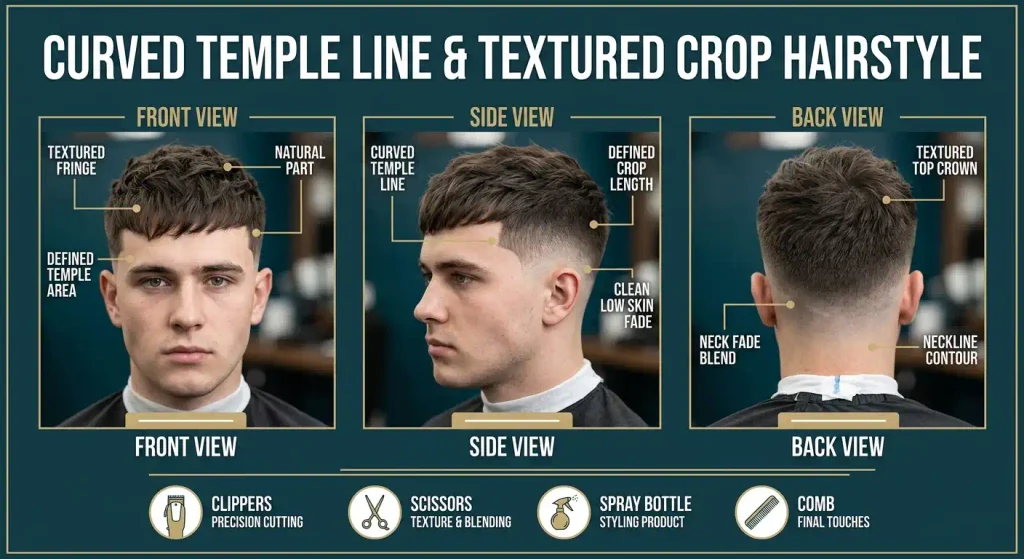
6. Curved Temple Line: low taper with design
A curved line follows the natural shape of the head rather than cutting across it. This makes the design look softer and more organic. It is a useful option for someone who likes detail but does not want a harsh geometric effect. Wavy and curly hair pair especially well with the curve because the texture adds movement around it. Oval and heart-shaped faces usually work well with softer lines. Use curl cream for textured hair or matte paste for straight hair.
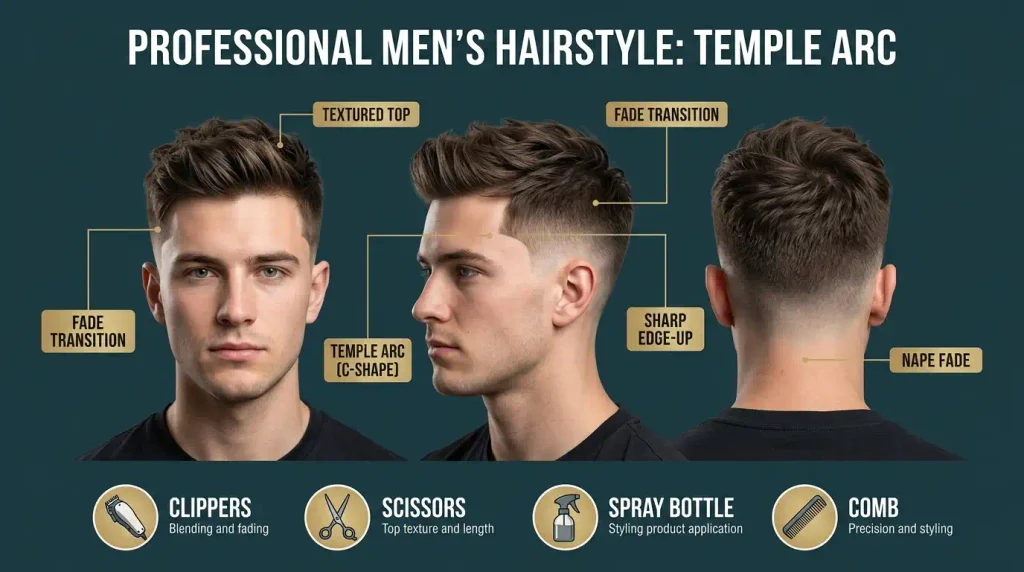
7. Temple Arc: low taper with design
The temple arc is a compact curved design placed close to the taper. Its smaller footprint makes it easier to maintain than a large pattern. Ask the barber to preserve the natural hairline and carve the arc into the shorter area rather than taking it too high. Fine hair benefits from a restrained version because excessive shaving can make the side look sparse. A light styling cream keeps fine or straight hair natural without adding unnecessary stiffness.
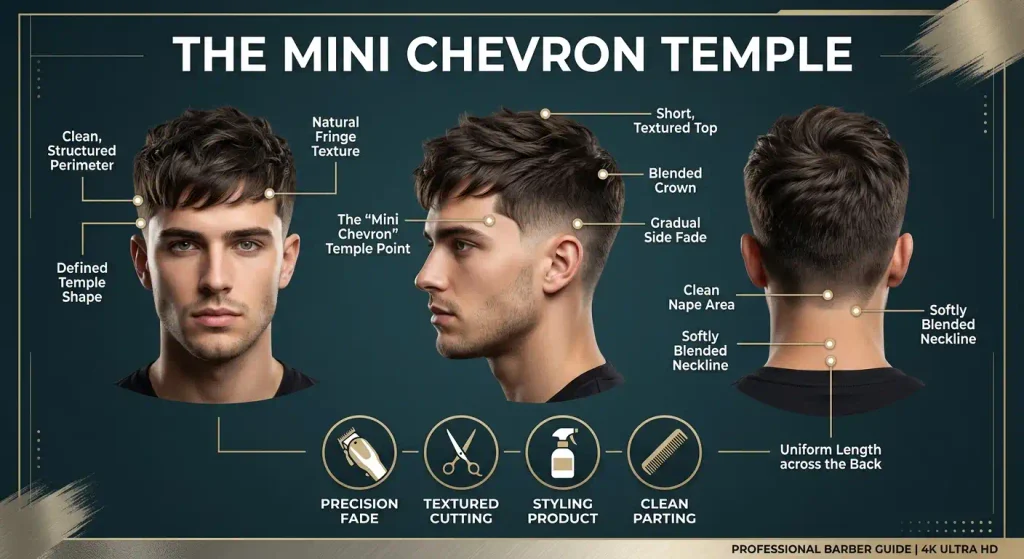
8. Mini Chevron Temple: low taper with design
A small chevron uses two angled lines that meet in a subtle point. It looks sharper than a single line but remains compact. Thick straight and coily hair provide strong contrast, while medium-density hair can also carry the design if the lines are not too wide. Square and oval faces are particularly easy matches. Keep the taper low around the ears and use a matte product on top. The design should remain the detail rather than compete with a complicated hairstyle.
9. Temple Corner Cut: low taper with design
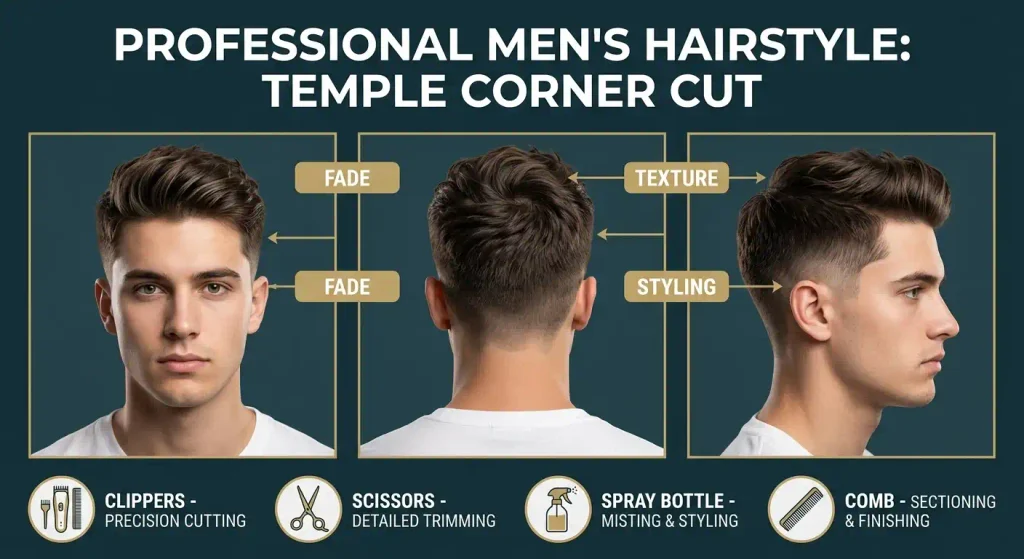
This design creates a small angular notch near the temple. It can visually sharpen the corner of the haircut without requiring a large pattern. The barber should use precise trimmer work and avoid cutting into the natural front hairline unless that is specifically requested. It suits straight and wavy hair especially well. A #1 or #2 guard can retain some density around the design. Keep the top textured with a light matte paste.
10. Small Diamond Detail: low taper with design
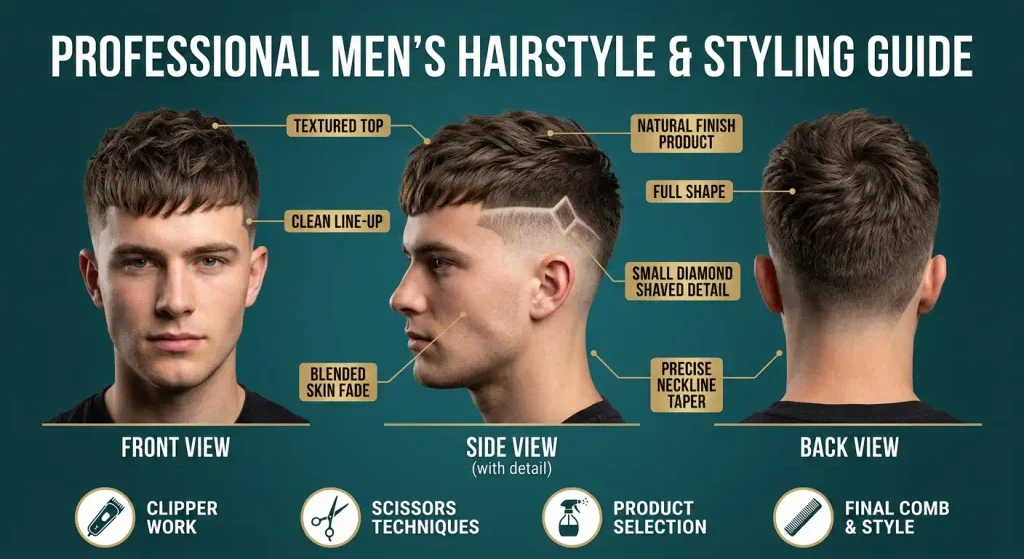
A tiny diamond shape offers a more artistic alternative to lines. Because the shape has four edges, precision matters more than size. It works best on dense hair where the surrounding area provides clear contrast. Oval and square faces can carry the geometric detail without much adjustment. Ask your barber to keep the taper low and the diamond compact. A natural matte clay finish on the top keeps the overall haircut balanced.
Back, Nape & Neckline Designs
11. Single Back Line: low taper with design
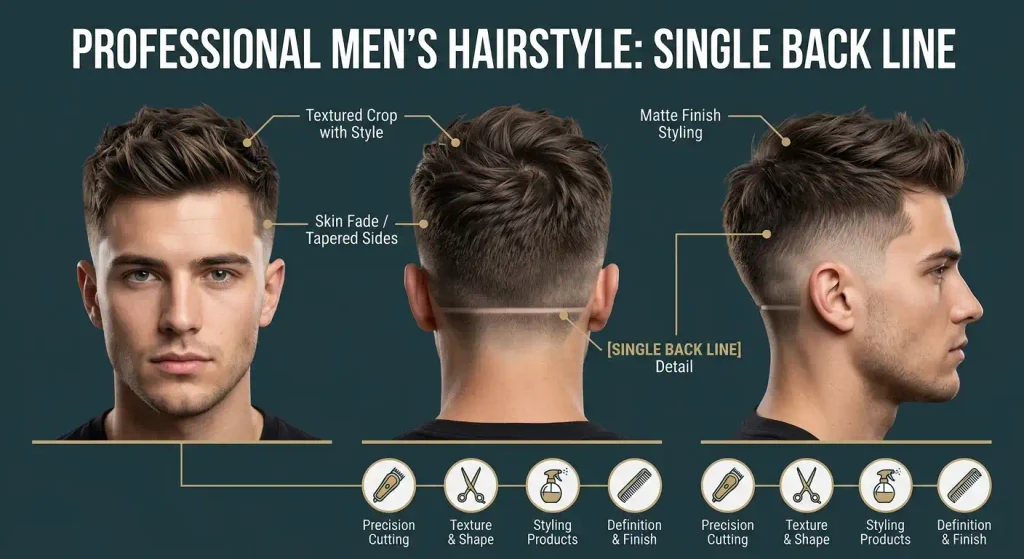
A single horizontal line across the lower back creates a clean detail without dominating the haircut. It works especially well when the top and crown are left longer. The barber should follow the natural shape of the head rather than forcing a perfectly straight line across a curved surface. Straight and thick hair make the design easy to see. This is a strong choice for someone who wants a back design that remains relatively subtle from the front.
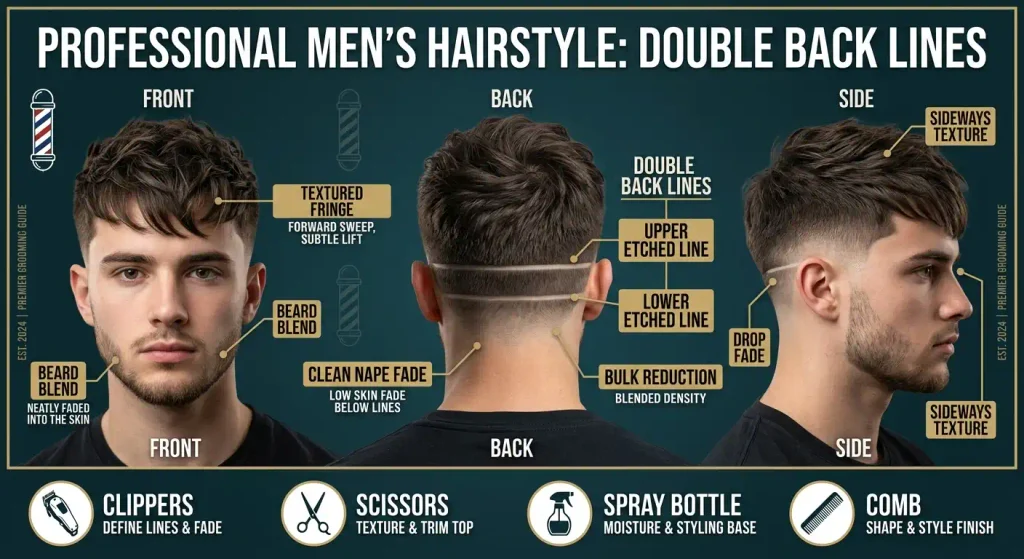
12. Double Back Lines: low taper with design
Two parallel lines across the nape create a balanced, sporty appearance. The taper can remain around #0.5 to #2 near the neckline while the upper section stays fuller. Symmetry is important, so this design needs a barber with steady trimmer control. It works with straight, wavy, curly, and coily hair, although thicker hair gives greater contrast. Use a light styling product on top and leave the back design crisp.
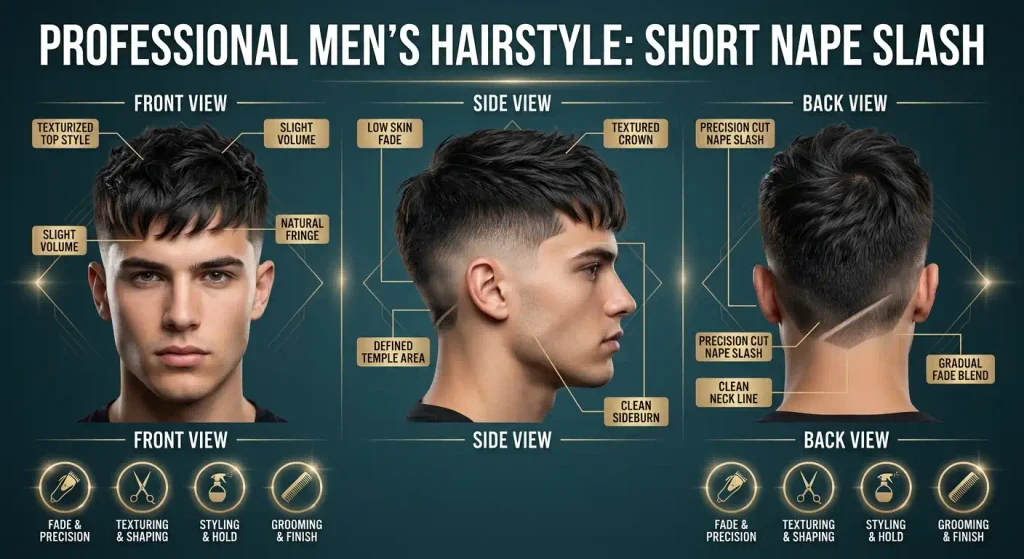
13. Short Nape Slash: low taper with design
A short diagonal slash placed at the nape is smaller than a full back design. It works well for people who want a hidden detail that is visible mainly from behind. The barber can position it on one side of the neckline rather than centering it. This asymmetry makes the haircut feel less formal. A low taper with a #0.5 or #1 shortest point gives enough contrast. The style requires little styling on top.
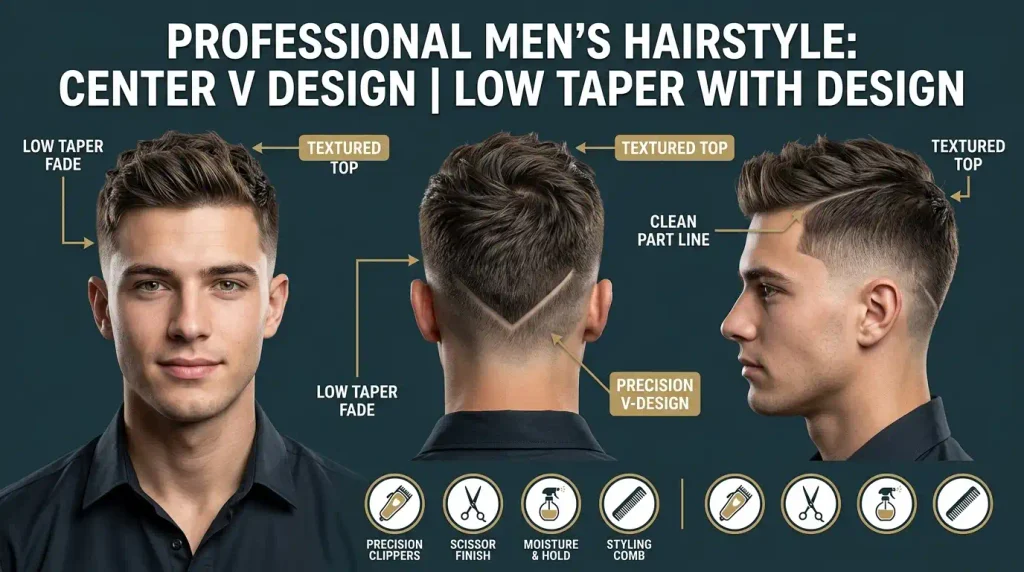
14. Center V Design: low taper with design
A V-shaped neckline gives the back a sharper outline. Rather than shaving a separate pattern into the taper, the barber shapes the neckline itself into a controlled V. This is best for straight and wavy hair, although curly hair can also carry it with careful edging. Square and oval faces usually pair well with the sharper finish. Tell your barber not to make the V excessively deep. A clean natural top completes the look.
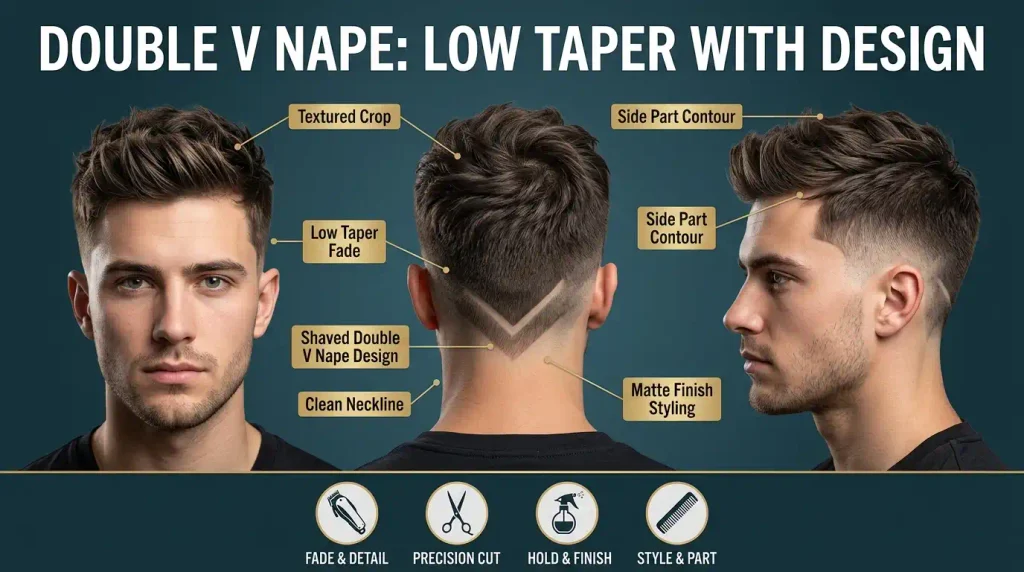
15. Double V Nape: low taper with design
The double V adds a second smaller point inside or above the main V. It is more detailed than a normal V neckline but still symmetrical. This design works best when the nape has enough density to preserve clear edges. Thick straight and coily hair are strong choices. The taper should remain low so the design does not turn into a large shaved panel. Use matte clay or styling cream depending on your top texture.
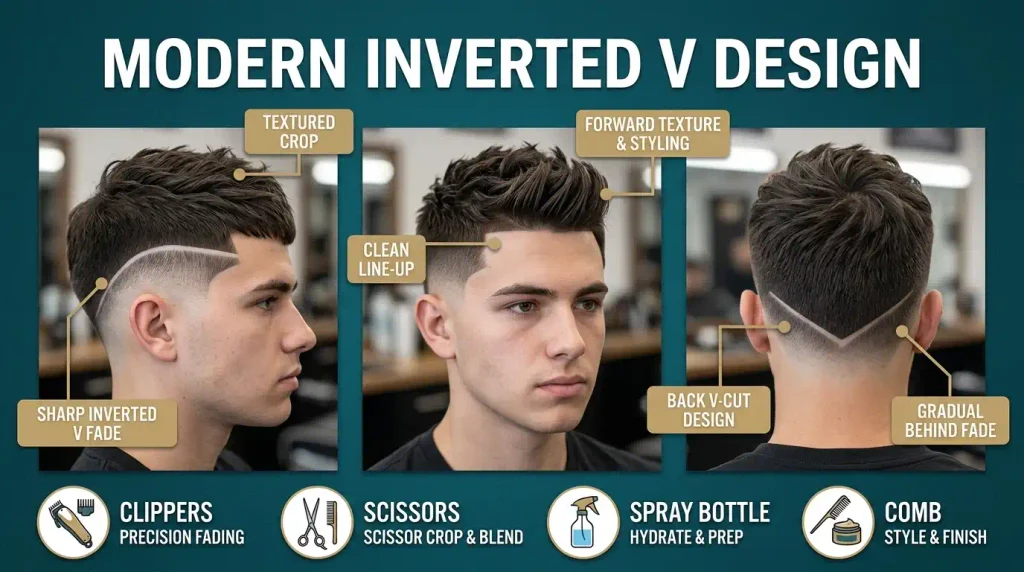
16. Inverted V Design
An inverted V points upward rather than downward and can create a distinctive geometric finish at the back. It suits people who want a noticeable but controlled neckline design. Straight and thick hair make the shape easiest to see. The barber should map both sides before cutting to maintain symmetry. A #1 to #2 transition above the neckline can preserve the low-taper character. Keep the top moderately textured instead of overly styled.
17. Back Arrow
The arrow design uses angled lines that meet at a point. It creates more movement than a simple V and looks particularly strong on dense hair. A barber can scale the arrow to fit a small nape or a wider lower-back area. Oval and square face shapes can carry the stronger geometry easily. Ask for clean trimmer lines and a low taper that does not rise into the middle of the head. Matte clay is a practical top product.
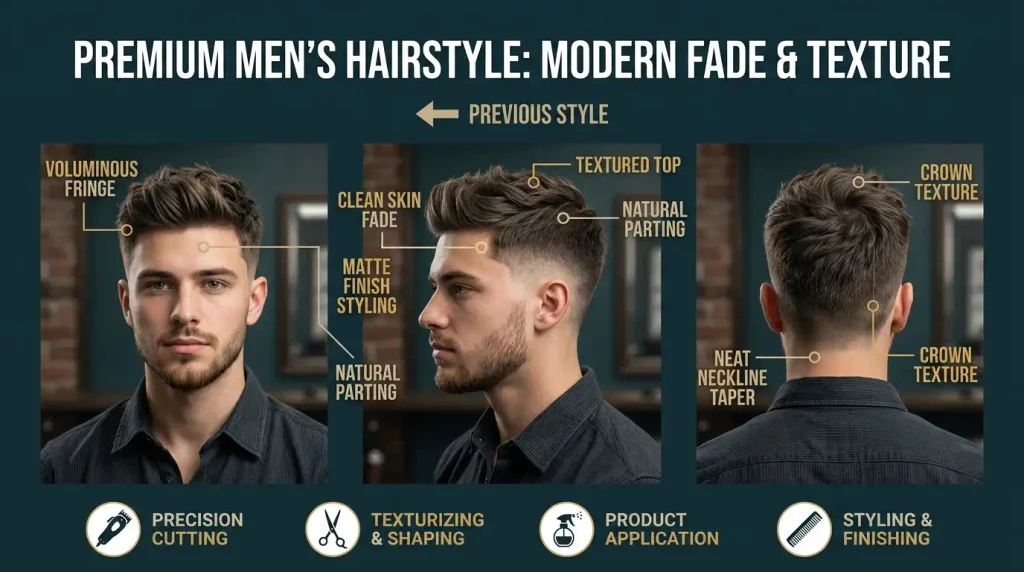
18. Back Crescent
A crescent uses a curved shaved line that follows the lower shape of the head. It gives the design a softer appearance than arrows or zigzags. Curly and wavy hair make an attractive pairing because the natural texture contrasts with the smooth curve. Heart and oval faces can suit the softer geometry. The barber should keep the curve consistent from both sides. Curl cream works well for textured hair.
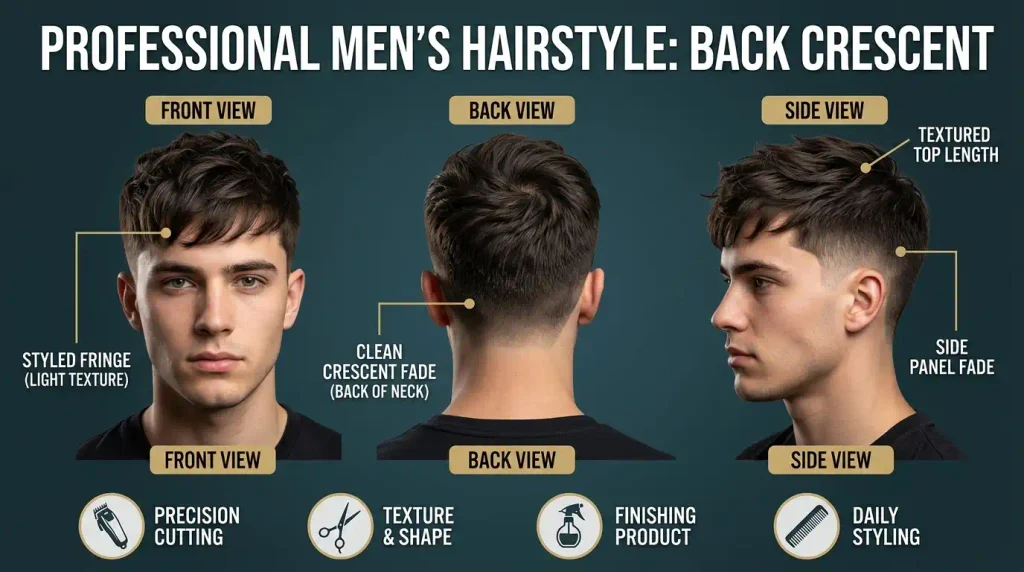
19. Nape Wave
A small wave pattern creates movement at the neckline. It is less aggressive than a lightning design and can look very clean when kept narrow. Wavy or curly hair provides an interesting contrast, while straight hair makes the pattern easier to see. The low taper should remain close to the neckline so the wave does not become lost in a larger fade. Use a natural styling cream on top for a relaxed finish.
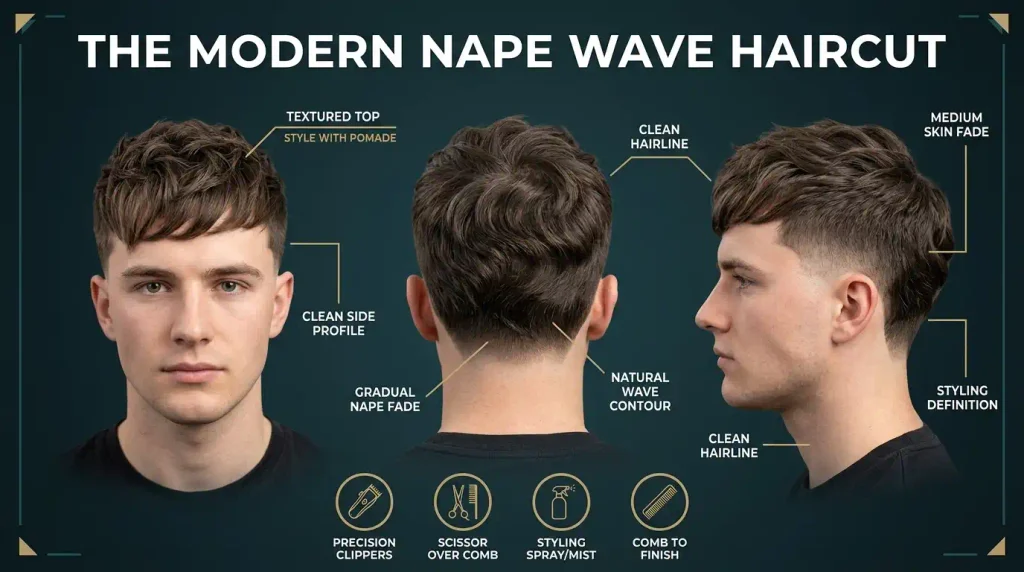
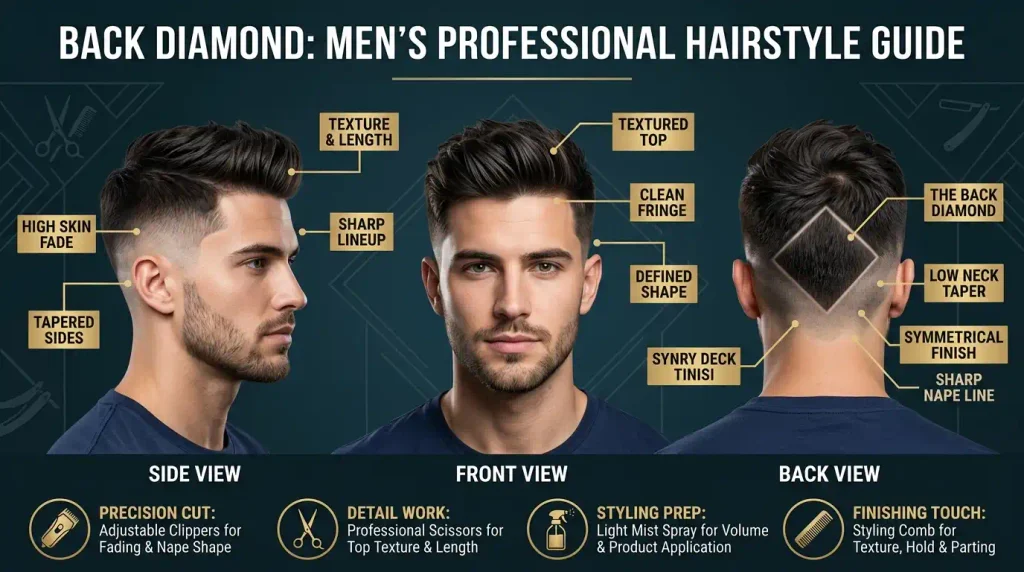
20. Back Diamond
A diamond carved into the lower back creates a clear focal point. It needs enough density around the design to avoid looking disconnected. Thick hair is preferable, especially if the design is medium-sized. The barber should establish the center point before carving the four sides. Oval and square faces usually handle this bold geometry well. Keep the top simple and use matte clay rather than a glossy product.
Geometric & Bold Designs
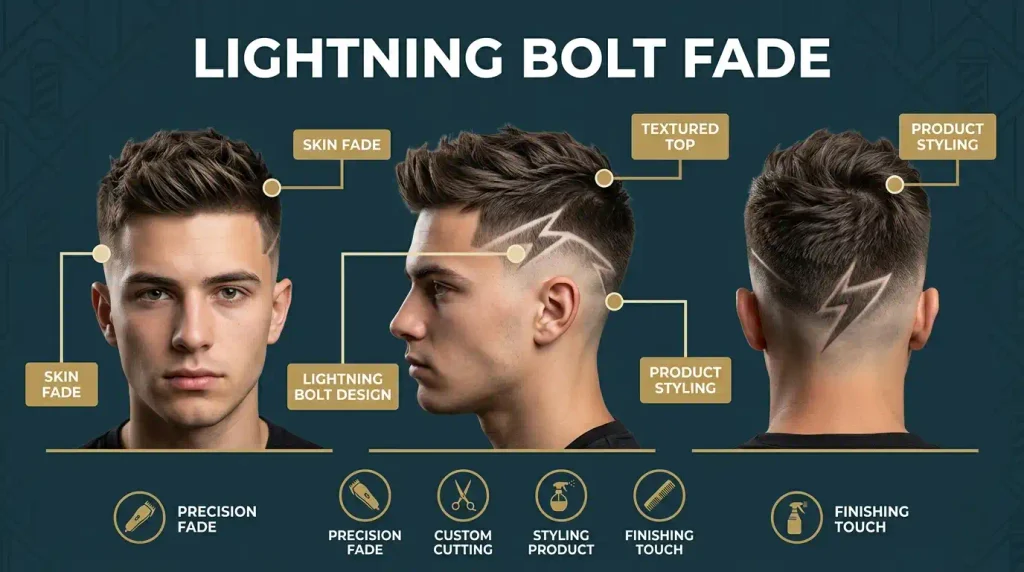
21. Lightning Bolt
The lightning bolt is one of the easiest bold designs to recognize. Its sharp changes in direction give the taper an energetic appearance. It works particularly well with thick, curly, or coily hair because the contrast is strong. The barber should use a trimmer for the outline and refine the edges carefully. A low taper around #0.5 through #2 keeps the overall cut balanced. This is more suited to casual settings than conservative workplaces.
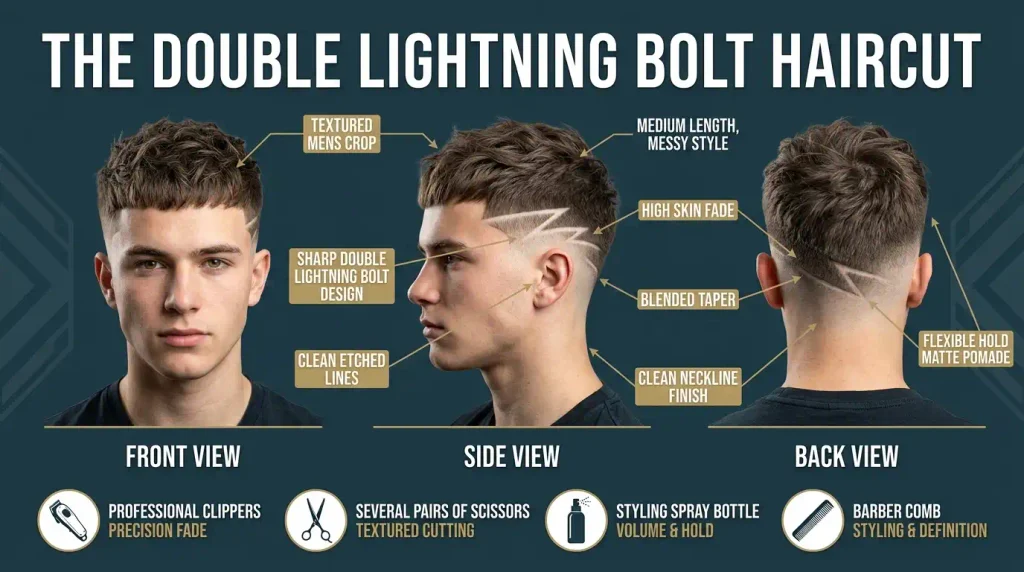
22. Double Lightning Bolt
Two lightning bolts increase the visual impact without requiring a large freestyle pattern. They can be placed on the side or back, depending on how visible you want the design. Dense hair makes the shaved sections stand out. Round faces can benefit from the directional angles, while oval faces need little adjustment. Avoid an overly complex top. Matte clay or textured paste keeps the hairstyle controlled while the design provides the visual interest.
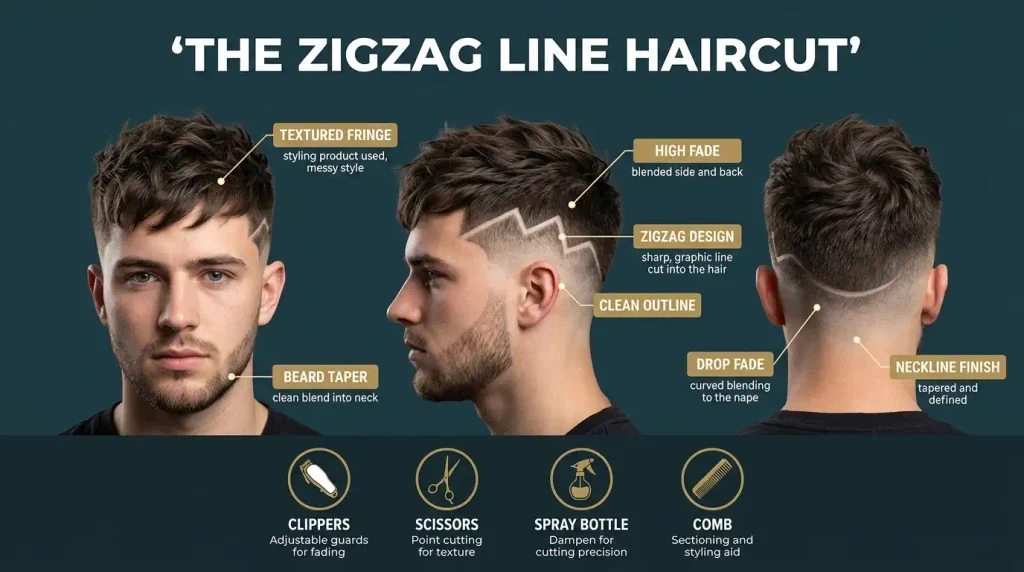
23. Zigzag Line
A zigzag uses repeated angles instead of the sharper silhouette of a lightning bolt. The barber can make the pattern small near the temple or larger along the side. Medium-to-thick hair is ideal because the surrounding hair creates contrast. Straight hair produces the cleanest outline, while curly hair gives a stronger texture-versus-design effect. Keep the taper low and ask for crisp corners. A matte finish works best with this graphic style.
24. Double Zigzag
Two connected zigzag lines create a more complex pattern. It is important to leave enough space between the lines so they do not merge as the hair grows. This look suits thick straight, wavy, curly, and coily hair. Square and oval faces can handle the stronger geometry. Ask the barber to map the pattern first and check both angles before shaving. A light matte product on top avoids visual overload.
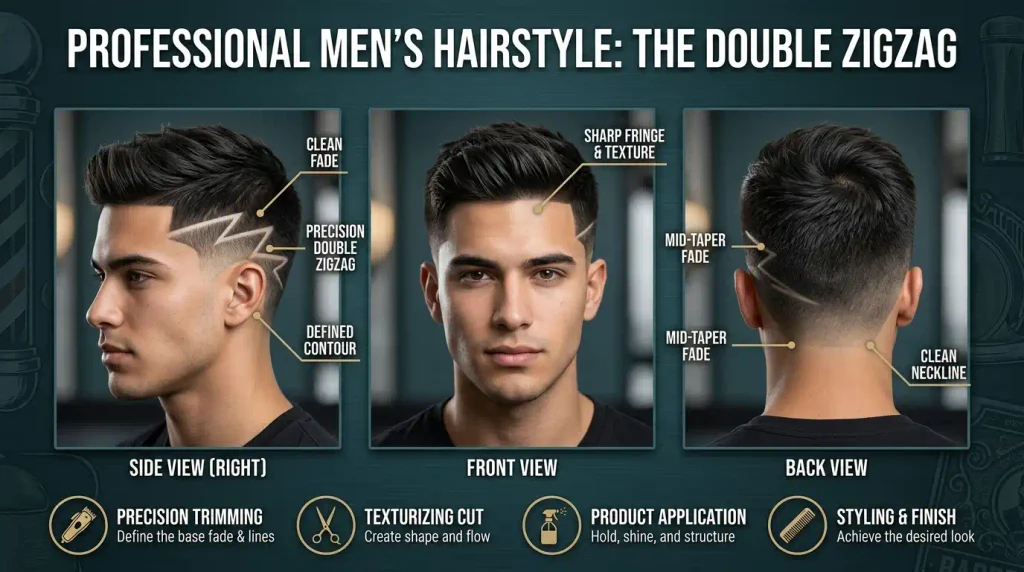
25. Geometric Triangle
A triangle is a simple geometric shape that looks custom without covering much space. The barber can place it near the temple, above the ear, or at the nape. Thick hair creates the strongest contrast. Fine hair should use a smaller triangle to avoid exposing too much scalp. Oval and diamond face shapes can work especially well with angular designs. Keep the taper around the lower #0.5 to #2 range and style the top with matte clay.
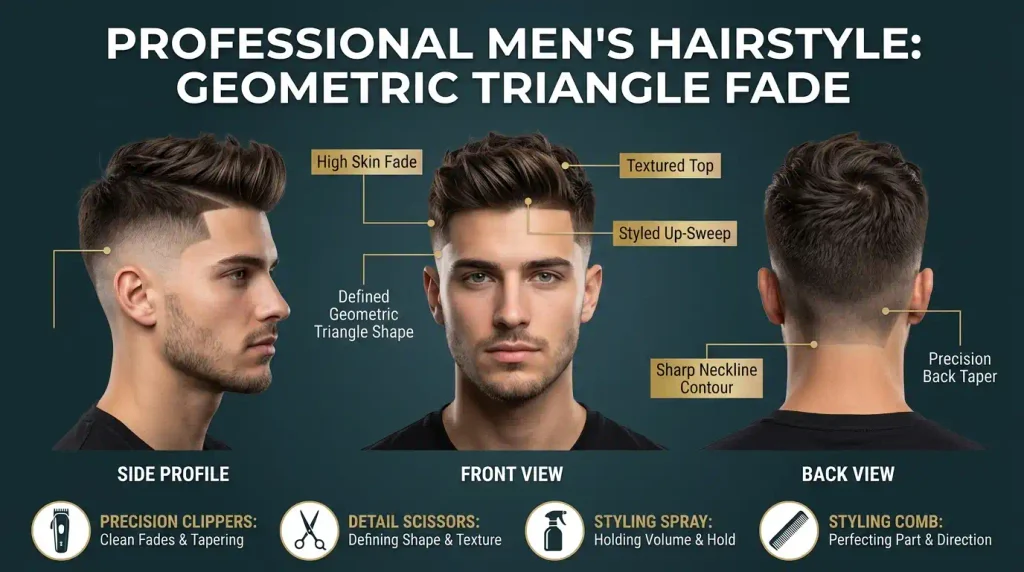
26. Stacked Triangles
Several small triangles arranged in a row create a modern geometric pattern. This is more advanced than a single triangle because spacing and symmetry become important. It works best with dense hair and a barber experienced in design work. A low taper should remain controlled so the shapes do not disappear into a broad fade. Straight and coily textures both offer strong contrast. Keep the hairstyle above simple with a natural matte finish.
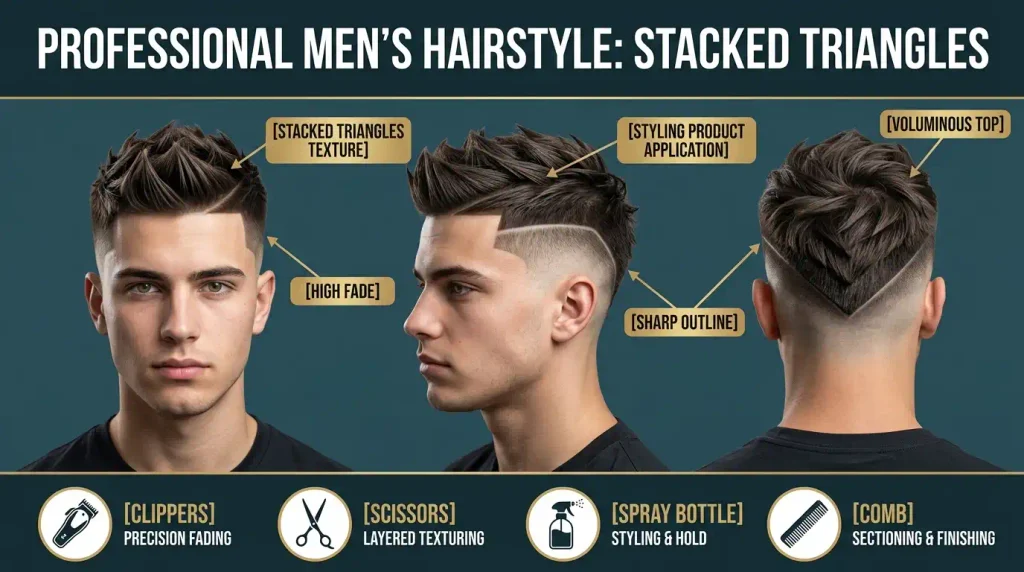
27. Geometric Cross
A small cross-shaped design can be built from intersecting lines near the temple or nape. The compact form makes it easier to wear than a large graphic. Dense hair is helpful because the surrounding area needs enough contrast. The barber should use a trimmer for the basic shape and refine it with careful edging. This style works best with a simple top and a low taper that stays close to the natural hairline.
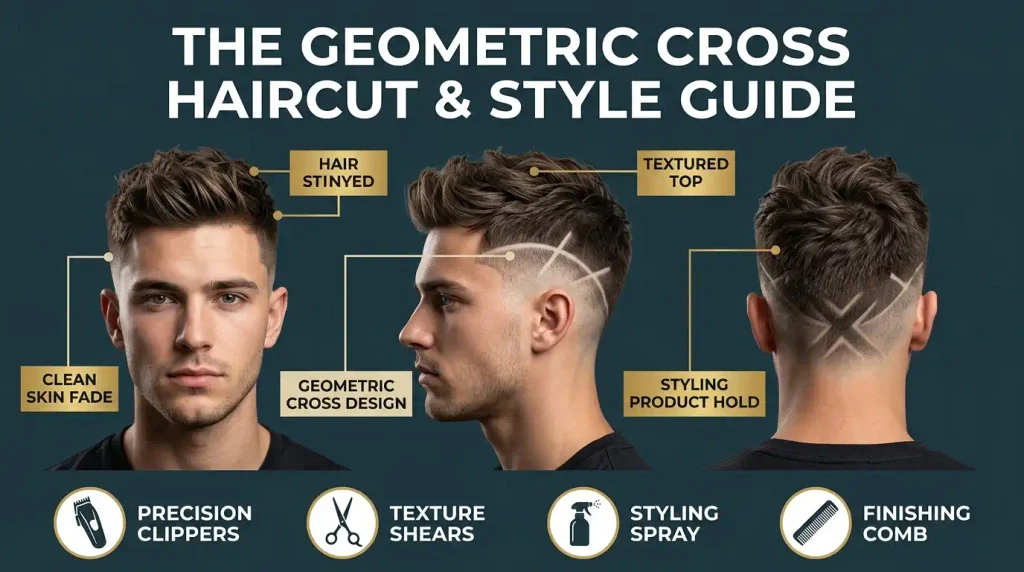
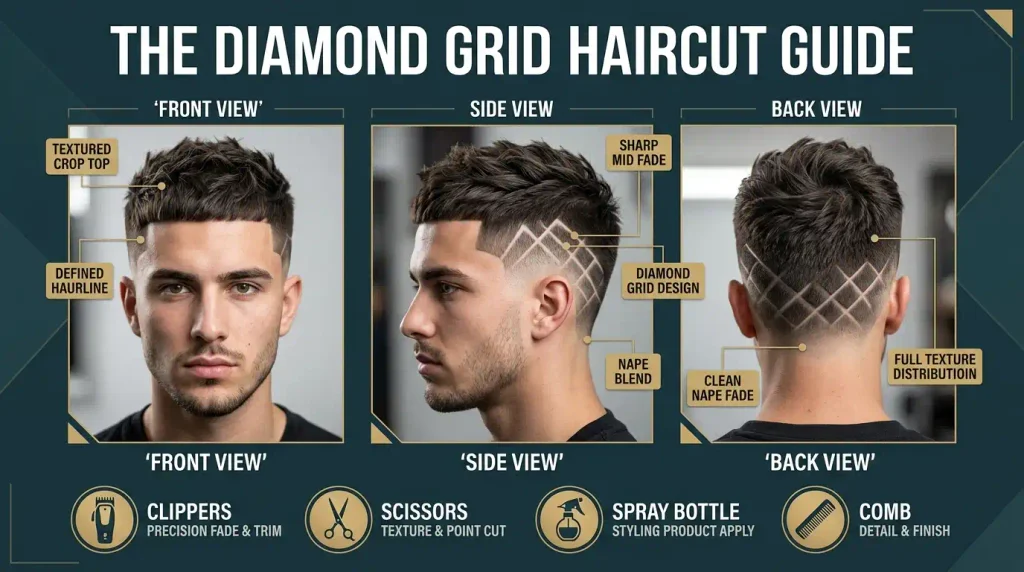
28. Diamond Grid
A diamond grid combines several connected geometric shapes. It is a higher-skill design because every line needs consistent spacing. Thick straight or coily hair is preferable. The design can sit on the side or back while the taper remains around #1 to #2 above the shortest area. Because the pattern is already detailed, avoid pairing it with a highly complicated hairstyle. Matte clay provides texture without adding shine.
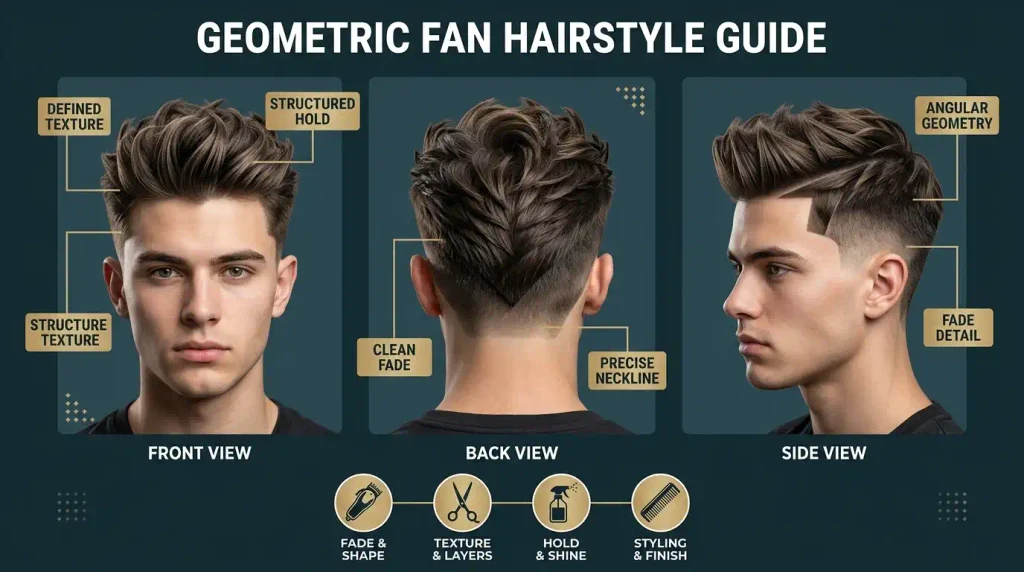
29. Geometric Fan
A fan design spreads several curved or angled lines from one point. It creates movement without looking like a traditional lightning bolt. It works well at the temple and behind the ear. Wavy and curly hair add an interesting contrast, while thick straight hair makes the fan crisp. The barber should scale the fan to the head rather than copying the exact size from a photograph. A light styling cream keeps the top flexible.
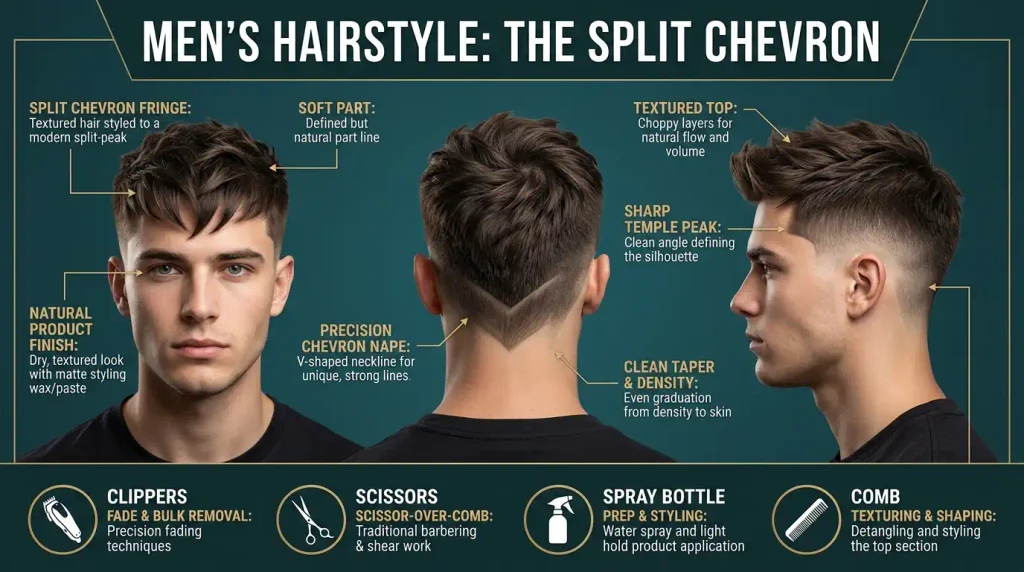
30. Split Chevron
The split chevron uses a central angle with two separated extensions. It looks sharper than a curved design but less aggressive than a full zigzag. Dense hair makes the pattern stand out. Oval and square faces are natural matches, while round faces can use a slightly upward angle to add visual direction. Ask the barber to keep the taper low and the design narrow. Matte paste gives the top enough separation without excessive shine.
Freestyle, Artistic & Custom Designs
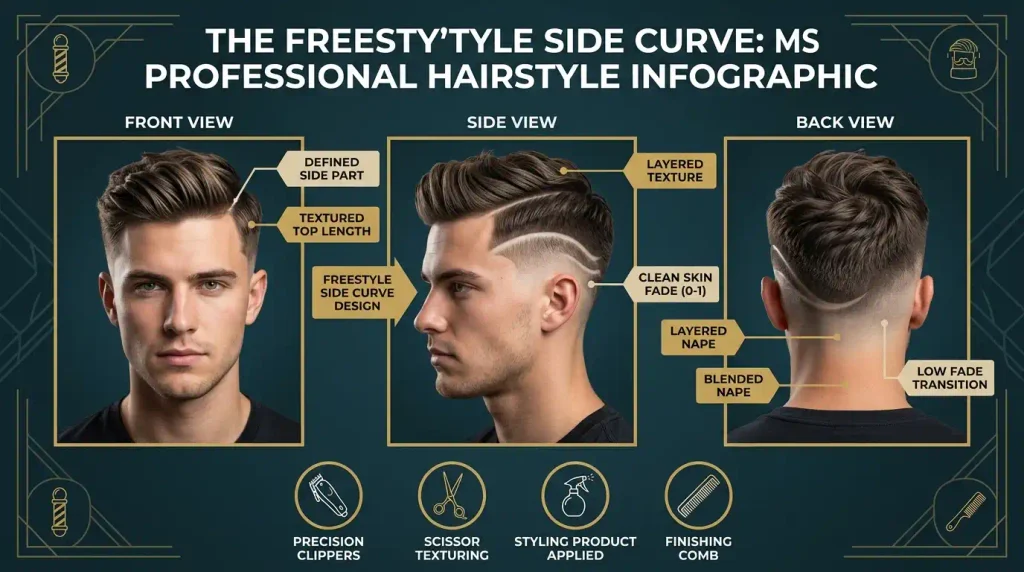
31. Freestyle Side Curve
A freestyle curve gives the barber more creative freedom than a fixed geometric shape. You can choose a general direction while allowing the barber to adapt the pattern to your head. This works particularly well with wavy or curly hair because the organic line complements the texture. Oval and heart-shaped faces can suit softer patterns. Show your barber a reference and ask for a low taper around the natural hairline. Curl cream or matte paste can finish the top.
32. Freestyle Back Pattern
A custom back pattern turns the nape into the main feature. The design might combine curves, short lines, and small geometric elements. Because the back of the head is curved, the barber should adapt the pattern rather than copy a flat image exactly. Thick hair gives the best contrast. This style suits creative settings and people comfortable with frequent touch-ups. Keep the top simple so the back remains the main visual feature.
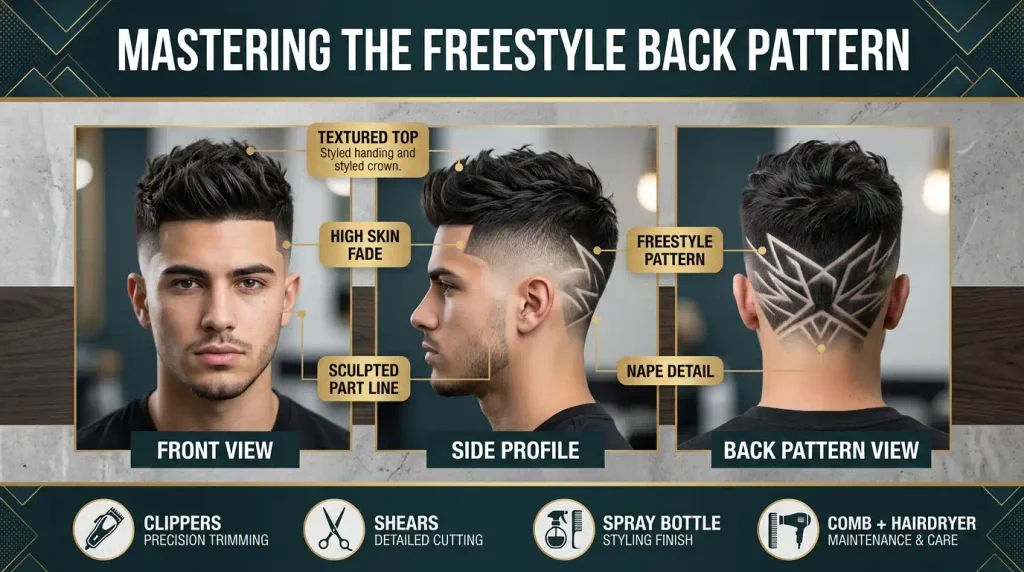
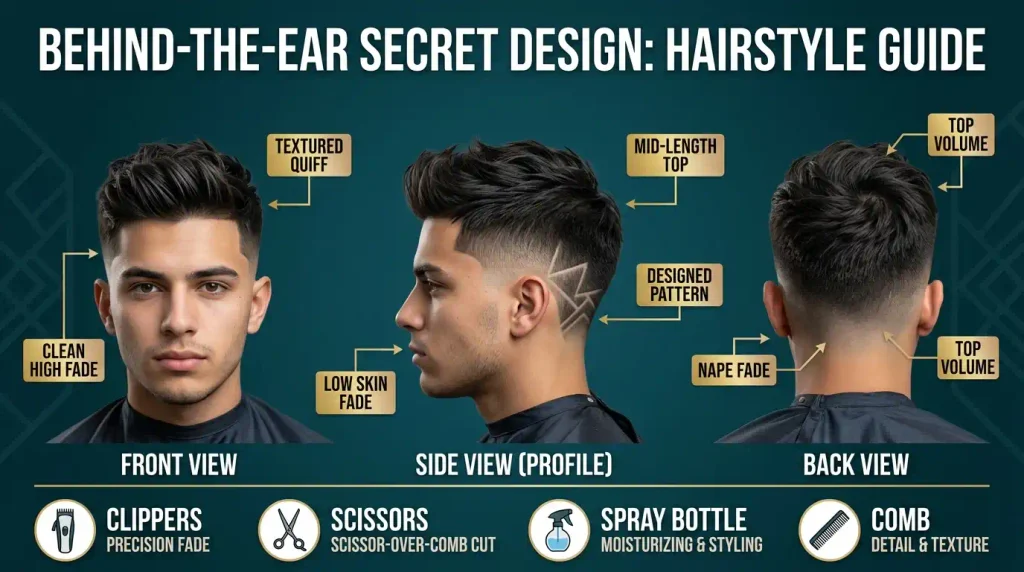
33. Behind-the-Ear Secret Design
A small design hidden behind the ear is one of the most discreet options. It appears when the head turns but stays relatively invisible from the front. This makes it useful for people who want personal detail without a highly visible pattern. Straight, wavy, and curly hair can all work. The barber should keep the taper low around the ear and avoid taking the design too far toward the temple. Light styling cream is enough.
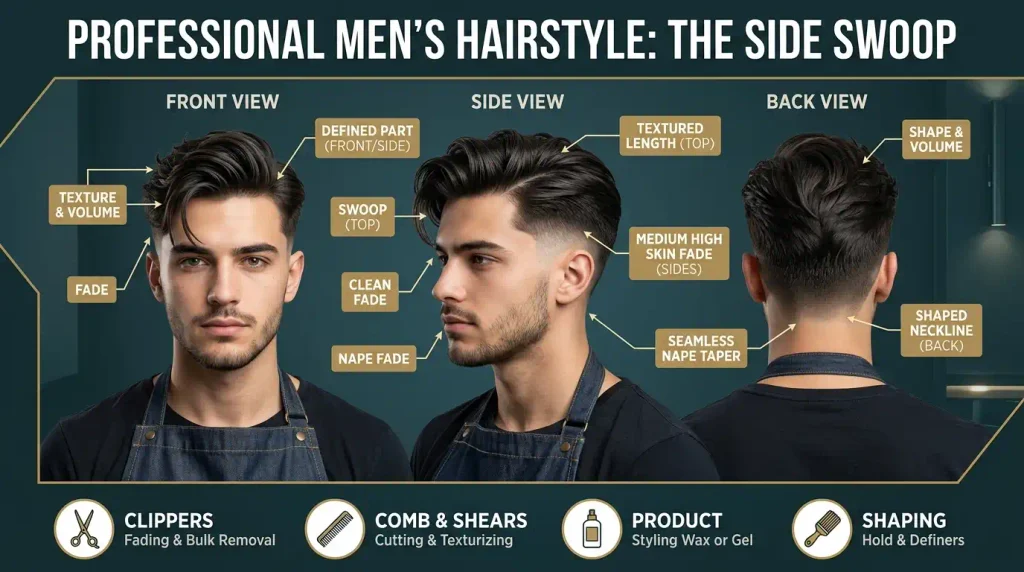
34. Side Swoop
The side swoop combines one curved shaved line with a longer top that moves in the same direction. The visual flow makes the haircut feel connected rather than having an isolated design. Wavy and straight hair are especially good choices. Oval and long faces can benefit from keeping the top controlled rather than adding excessive height. Ask for a low taper around #0.5 to #2 and use matte paste to direct the top.
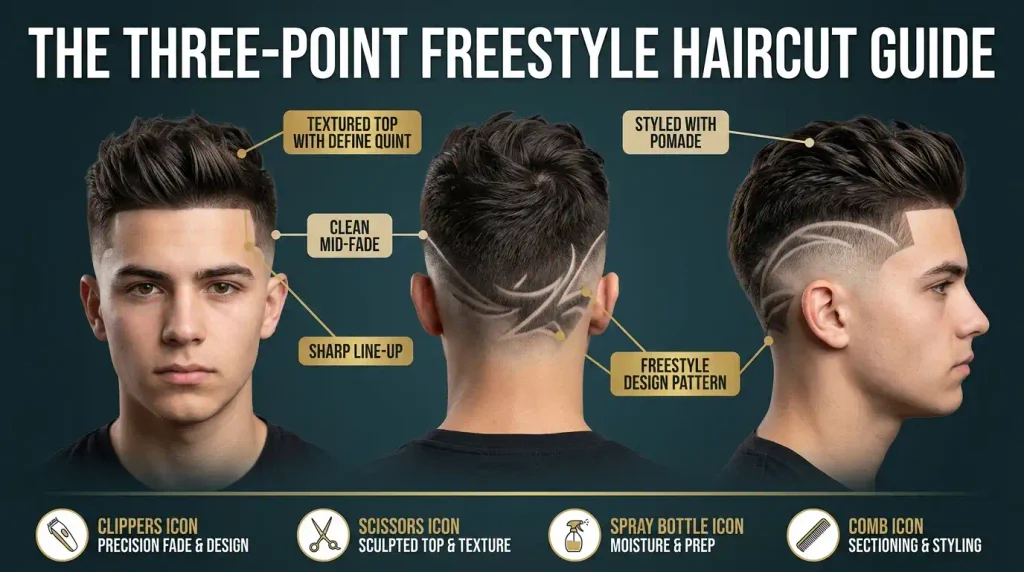
35. Three-Point Freestyle
Three small points or angles can be connected into a custom design. The barber can position them around the temple or side depending on your hairline. This works best on thick hair because each point needs surrounding density. Square, oval, and diamond faces can handle the angular shape. Keep the taper low and ask for clean negative space between each section. A matte clay finish complements the design.
36. Wave-and-Line Combo
This design mixes one curved line with one straight line. The contrast gives the haircut a custom appearance without requiring a large pattern. It suits wavy and curly hair especially well because the natural texture echoes the curved section. Oval and heart-shaped faces can carry the softer arrangement. Tell the barber to keep the two elements clearly separated. Curl cream or light styling cream can keep the top natural.
37. Spiral Detail
A compact spiral is a creative option for the temple or lower side. It requires precise trimmer control because uneven curves can quickly change the shape. Thick straight and coily hair provide good contrast. The design can be kept small enough for a more wearable finish. Ask the barber to leave the surrounding taper clean and low. Avoid heavy styling products; matte paste or a light cream is enough.
38. Flame Pattern
A flame pattern uses several pointed curves to create a rising shape. It is more expressive than a simple lightning bolt and works well for casual, creative looks. Thick curly or coily hair gives excellent contrast. The barber should keep the flames proportional to the head and avoid overcrowding the side. A low taper around #0.5 through #2 maintains the clean base. Matte clay works well with the textured top.
39. Wing Design
The wing design uses mirrored curves or angled strokes extending outward from a central point. It can be placed at the back or side. Thick hair is best because the design relies on contrast. Symmetry matters, especially if the design is centered on the nape. Oval and square faces can handle the bold shape. Ask the barber to keep the upper taper fuller so the design does not disappear into the fade.
40. Custom Initial
A single initial can turn the design into something personal. It works best when the letter is simple enough to remain readable as the hair grows. Thick hair gives the strongest background contrast. The barber should sketch or map the letter before committing to the final cut. A low taper with a #1 to #2 transition around the surrounding area keeps the design defined. Keep the top natural and matte.
Hair-Type & Top-Hairstyle Designs
41. Low Taper with Design for Curly Hair
Curly hair creates natural volume above a clean design, making the contrast especially strong. A single line, curved pattern, or small geometric shape usually works better than an overly crowded design. The taper can begin around the natural temple and ear area while leaving enough curl volume above it. Oval, square, and round faces can all work with the right top shape. Use curl cream to define curls while avoiding heavy products that flatten them.
42. Low Taper with Curly Top and Back Design
A longer curly top combined with a small back or nape design creates contrast from front to rear. The top should retain enough length for the curls to form naturally. A simple V, arrow, or short curved line at the back keeps the combination balanced. Curly and coily textures are ideal. Round faces can benefit from controlled height, while long faces should avoid excessive vertical volume. Curl cream is the natural product choice.
43. Wavy Top with Curved Side Design
Wavy hair pairs naturally with curved designs because both create flowing lines. Keep the taper low and allow the top to retain its natural movement. A curved temple or side arc looks more integrated than a rigid geometric pattern. Oval and heart-shaped faces are easy matches, while round faces can benefit from some controlled top height. Use sea salt spray for texture or a light matte cream when you need more control.
44. Straight Textured Crop with Temple Design
A straight textured crop gives the design a clean frame. The barber can use point cutting on top to create separation while keeping the sides low and controlled. A single slash, double line, or small chevron works particularly well. Round faces can benefit from a textured fringe with some upward movement, while square faces can keep the crop flatter. Matte clay is useful for creating piecey texture without shine.
45. Curly Fringe with Side Line
A curly fringe paired with one clean side line creates a strong contrast between natural texture and precise barbering. The taper should stay low so the curls remain the focus from the front. This works well with thick curly hair and suits oval, square, and round faces. Ask the barber to avoid over-thinning the curls. Curl cream keeps the fringe defined, while a small amount of matte product can control stray hairs.
46. French Crop with Geometric Design
The French crop gives a neat, compact top that works well with a geometric side design. Point cutting can create texture through the crop without making the top too bulky. A triangle, chevron, or short double line provides enough contrast. Round and oval faces can work particularly well with this shape. Keep the taper around the lower #0.5 to #2 range. Matte clay is the best fit for a textured crop.
47. Textured Quiff with Side Design
A textured quiff adds controlled height above a low taper and gives the design a strong frame. Straight and wavy hair are easiest to shape into this look. Round faces can benefit from moderate height, while long faces should keep the quiff lower. A single curved line or diagonal slash works better than a large pattern. Use a small amount of matte clay and direct the front upward and slightly back.
48. Comb Over with Hard Design Line
A comb-over can be paired with a shaved design that doubles as a visual dividing line. The barber should keep the low taper soft around the temple while creating a clear separation through the side. Straight and wavy hair are easiest to manage. Oval and square faces work naturally with the style. A light matte paste gives enough control for the comb-over while keeping the haircut modern rather than overly glossy.
49. Messy Top with Small Temple Design
A messy top creates a relaxed contrast with a precise temple design. The key is keeping the mess controlled rather than letting the whole haircut become shapeless. Straight, wavy, and thick hair can all work. A small line, arc, or corner design is enough because the textured top already adds visual interest. Round faces can use some height, while long faces should keep the top flatter. Matte clay is the natural choice.
50. Slicked-Back Top with Back Design
A slicked-back top makes the back design visible from multiple angles because the longer hair is directed away from the neckline. Straight and wavy hair work best. The barber should keep the taper low and clean without pushing it too far up the back. Oval and square faces usually suit the balanced silhouette. A light styling cream gives control with a softer finish; a stronger pomade can be used when more hold is needed.
51. Low Taper with Beard and Side Design
A side design can connect visually with a neatly shaped beard. The taper around the sideburn should transition smoothly into the facial hair rather than creating a disconnected block. A single line or small geometric detail works better than an oversized pattern. Square and oval faces suit this combination well. Thick hair and medium-to-full beards provide the strongest contrast. Use matte clay for the hair and a suitable beard styling product separately.
52. Low Taper with Edgar and Front-to-Side Design
An Edgar-style top creates a sharp horizontal front while a small side design adds movement. The design should remain near the taper so the front edge stays the main structural feature. Thick straight or coily hair works especially well. Round faces can benefit from the squared front shape. Ask the barber to use controlled point cutting rather than making the top overly soft. Matte clay keeps the texture crisp.
53. Low Taper with Mullet and Nape Design
A low taper can frame a longer mullet while the nape becomes the natural location for a small design. A V, short slash, or simple geometric mark works well. Straight, wavy, and curly textures can all support the shape. The barber should preserve the longer rear length while tapering the lower neckline carefully. This is a more expressive style, so it fits casual settings best. Matte texture products suit the top and sides.
54. Low Taper with Design and Long Top
Keeping more length on top makes the taper and design feel understated from the front. This is useful when you want a design but still want the haircut to have a classic silhouette. Straight and wavy hair are easy to style, while curly hair creates a stronger contrast. Oval and heart-shaped faces are versatile choices. Use sea salt spray for loose texture or matte cream for controlled movement.
55. Low Taper with Design and Natural Texture
The final option keeps the haircut intentionally simple: a low taper, one carefully chosen design, and natural texture on top. Rather than forcing the hair into a specific shape, the barber works with its existing pattern. This makes the style adaptable to straight, wavy, curly, and coily hair. Choose a design based on density and hairline rather than copying another person’s head exactly. A light styling cream is enough for most natural-texture finishes.
Master Barber Phrasing: How to Ask for the Cut
The safest way to communicate the haircut is to describe the taper height, shortest guard area, design placement, top length, and neckline.
Copy-and-paste barber script
“I want a low taper around my temples, sideburns, ears, and neckline. Keep the taper low and don’t let it climb into a mid or high fade. Start the shortest area around a #0.5 or #1, then blend upward through #2 and #3 as needed. Keep the top length and texture intact. I want [design name] placed on the [side/temple/back/nape]. Please show me the placement before cutting the design.”
Useful variation add-ons
For a simple side design:
“Keep it to one clean line above the taper and don’t change my natural front hairline.”
For a back design:
“Keep the design centered and adapted to the curve of my head. I want the neckline clean but not excessively high.”
For curly hair:
“Keep enough length and weight on top for my curls. Don’t over-thin the curl pattern.”
For a bold freestyle design:
“Use the reference as inspiration, but adapt the pattern to my head shape and hair density. Keep the taper low.”
A reference photo is still valuable because terms such as “low,” “sharp,” and “bold” can mean different things to different people. Current barber guidance also emphasizes specifying placement and complexity before the design is cut.
This Style vs. Other Taper and Fade Options
| Haircut | Fade/Taper Height | Typical Guard Range | Best Face Shapes | Main Difference |
| Low taper | Low around temples/ears/nape | #0–#3+ | Most shapes | Soft, controlled transition |
| Low taper + design | Low | #0–#3+ | Most shapes | Adds carved visual detail |
| Mid taper | Around mid-temple area | #0–#3+ | Oval, square | More visible side transition |
| High taper | Higher around temple | #0–#3+ | Oval, diamond | Stronger contrast |
| Low fade | Low but broader fade area | #0–#3+ | Most shapes | Larger faded section |
| Mid fade | Mid-side fade | #0–#3+ | Oval, square | Stronger side contrast |
| High fade | High side fade | #0–#3+ | Oval, diamond | Maximum contrast |
| Skin fade | Blends to skin | #0/skin upward | Depends on top | Very close shortest finish |
Guard numbers describe clipper cutting lengths, but the exact transition depends on the clipper, lever position, hair density, and barber technique. A low taper should remain visually low even when the barber uses several guards to remove weight and create a smooth blend.
Why This Look Works
The appeal comes from contrast.
The taper creates a clean frame around the ears, temples, and neckline. The design then adds a small area of strong visual contrast. That lets you customize a familiar haircut without needing an extreme change to the whole head.
It is also flexible. A single line can be subtle enough for everyday wear, while a large freestyle pattern can create a much bolder look.
The design should match your lifestyle, too. Complex patterns need more frequent touch-ups because the lines lose definition as the hair grows.
Best Hair Types and Face Shapes
Straight Hair
Straight hair gives designs the clearest outline. Lines, triangles, diamonds, and geometric patterns are easy to see. Matte clay or paste works well for adding texture without making the hair greasy.
Wavy Hair
Wavy hair adds natural movement around a design. Curved lines, arcs, and freestyle patterns often look more natural than rigid geometric shapes. Sea salt spray can enhance the wave.
Curly Hair
Curly hair creates a strong texture-versus-clean-design contrast. Keep the top long enough for the curl pattern to form properly. Curl cream is usually the most useful styling option.
Coily or Very Thick Hair
Dense hair creates excellent contrast against shaved designs. It can support more detailed patterns, but the barber needs good clipper control to keep the taper even.
Fine Hair
Fine hair benefits from smaller designs. Large shaved patterns may expose too much scalp and make the sides look thinner. A simple line or compact curve is usually safer.
Face-shape guide
Oval: Most variations work. You have room to experiment.
Round: Moderate height and directional designs can help create a longer visual profile.
Square: Sharp geometric designs work naturally with a strong jaw.
Long: Avoid excessive height on top. Keep the design lower and the top more controlled.
Heart: Softer curves and smaller designs can balance the wider upper face.
How to Style It
- Start with clean, towel-dried hair. Remove excess water without rough rubbing.
- Choose the product for your texture. Use curl cream for curls, sea salt spray for loose waves, or matte clay for textured straight hair.
- Shape the top first. Use your fingers or a comb depending on the hairstyle.
- Keep the design visible. Avoid styling the top so heavily that it hides the side or back detail.
- Check the silhouette. Look at the front and sides before leaving the house.
- Do not aggressively recreate the design at home. A small mistake with a trimmer can turn a clean line into an uneven patch.
Step-by-Step Barbering Tutorial
A professional barber should adapt the process to the client’s hair, density, head shape, and existing haircut. The following is a practical overview rather than a substitute for barber training.
Tools Required
- Professional hair clippers
- Adjustable clipper with lever
- Guards #0, #1, #2, #3 and #4
- Detail trimmer
- Foil shaver when a very close finish is requested
- Barber comb
- Clipper-over-comb tool or technique
- Sectioning comb or clips
- Barber shears
- Razor for suitable design work
- Neck duster
- Disinfectant and clean barber tools
- Styling product for the final finish
Cutting Sequence
1. Consult Before Cutting
Check the hairline, density, growth direction, crown, texture, and desired design placement. Confirm how low the taper should remain.
2. Establish the Low Taper
Start around the temples, sideburns, ears, and neckline. Depending on the desired finish, the shortest area may begin around a #0 or #0.5.
3. Build the Transition
Use #1, #2, and higher guards as needed. Adjust the clipper lever to remove visible lines between lengths.
4. Use Clipper-Over-Comb Where Needed
Clipper-over-comb helps remove weight above the shorter taper without creating an abrupt step. This is especially useful when the client has thick hair.
5. Shape the Top
Use scissors and point cutting where appropriate. The goal is to create the requested texture without destroying the natural pattern of curly or wavy hair.
6. Map the Design
Before cutting the design, confirm its position and scale. Symmetrical designs should be checked from multiple angles.
7. Cut the Design
A detail trimmer is useful for establishing precise lines. A razor may be used for a closer finish when appropriate and safe.
8. Refine the Blend
Step back and inspect the taper from the front, side, and rear. Remove dark spots or visible weight lines without pushing the taper higher than requested.
9. Finish the Hairline
Clean the edges while preserving the natural hairline unless the client specifically requests a changed shape.
10. Style and Review
Apply a suitable styling product and show the client the design from multiple angles. This is also the right time to explain maintenance.
Best Styling Product Chemistry
Matte Clay
Matte clay is useful when you want texture, separation, and a dry-looking finish. Clay-based products can provide grip and control without making the top look wet. They work especially well with straight or wavy hair and textured crops.
Sea Salt Spray
Sea salt spray adds texture and movement. It is useful for wavy hair or straight hair that needs more body. Use it when you want a loose, natural shape rather than a highly controlled finish.
Curl Cream
Curl cream is designed to support curl definition and reduce the need for aggressive manipulation. It is the better match for curly hair when the goal is to keep the natural pattern visible above the taper.
Styling Cream
A light styling cream gives softer control than clay. It works well when the goal is natural movement, especially with medium-length hair.
Pomade
Pomade can provide stronger control and a more polished finish. It suits slicked-back or combed styles, although a very shiny finish can compete with a detailed design.
Maintenance and Upkeep Guide
A fresh design is sharp because the shaved lines have strong contrast. As the surrounding hair grows, that contrast decreases.
For most people, a 2–4 week maintenance window is a practical starting point for the overall taper, with the exact timing depending on growth rate, haircut length, and how crisp the client wants the finish. Detailed designs may need attention sooner because the pattern becomes less defined as new hair fills in.
Between Barber Visits
- Wash the hair according to your hair type and scalp needs.
- Avoid repeatedly shaving the design yourself unless you have the skill to reproduce it accurately.
- Keep the neckline reasonably tidy.
- Use a product that matches your texture rather than forcing the same product onto every hair type.
- Protect curly hair from excessive brushing and manipulation.
- Take a photo of the original design if you want the barber to reproduce it later.
Common Mistakes to Avoid
Making the Taper Too High
The biggest mistake is asking for a low taper and receiving something that visually behaves like a mid or high fade. Tell the barber clearly that the transition must stay close to the natural hairline.
Choosing a Design Without Considering Density
A pattern that looks excellent on thick hair may look too exposed on fine hair. Let the barber scale the design to your density.
Copying a Design Exactly From Someone Else
Head shape, hairline, crown direction, and texture vary. A good barber should adapt the design rather than blindly copying its dimensions.
Adding Too Many Details
More lines do not automatically make a haircut better. If the top is already complex, a simple design often creates better balance.
Cutting the Natural Hairline Too Aggressively
A sharp lineup can look excellent, but changing the natural hairline too much may make future grow-out harder. Tell your barber whether you want your natural hairline preserved.
Ignoring Maintenance
Detailed designs lose crispness faster than a simple taper. If you cannot visit your barber regularly, choose a smaller pattern.
Using Too Much Product
Heavy product can make the top look stiff or greasy. The taper and design already provide structure, so the top usually needs controlled styling rather than excessive product.
Trying to Fix a Design at Home
One uneven trimmer pass can change the entire pattern. If the design has become uneven, let a skilled barber correct it.
Frequently Asked Questions
1. What is the best design for a first low taper?
A single temple line is usually the easiest starting point. It gives you a clear design without committing to a large pattern.
2. Can I get a low taper with a design on the back?
Yes. Back designs work especially well around the nape and lower back of the head. V shapes, double lines, arrows, curves, and small geometric patterns are practical choices.
3. Is a low taper with a design good for curly hair?
Yes. Curly hair creates strong contrast against clean shaved lines. A simple side curve, temple line, or small back design can look especially sharp. Keep enough length on top for the curl pattern to remain natural.
4. Should I choose a side or back design?
Choose a side design if you want it visible most of the time. Choose a back design if you want a more discreet detail that appears mainly from behind.
5. Which design is number 21, and who should get it?
Number 21 is the Lightning Bolt. It suits people who want a bold, energetic design and works especially well with thick, curly, or coily hair.
6. What is the difference between the Number 14 Center V and Number 15 Double V?
The Center V uses one main V-shaped neckline. The Double V adds another smaller V for extra detail. The double version requires more precise symmetry and maintenance.
7. What guard should I ask for?
There is no single correct guard combination. A barber may use a #0 or #0.5 at the shortest point and blend through #1, #2, and higher guards depending on the hair and desired transition. The important part is that the taper remains low.
8. How often should I maintain the haircut?
A practical starting point is every 2–4 weeks for the overall taper. A detailed design may need a sooner touch-up if you want the lines to remain very crisp.
Conclusion
A low taper becomes much more personal when you add the right design. The strongest choice is not always the biggest pattern. A clean line, curved detail, small back design, or carefully scaled geometric shape can create enough contrast while keeping the haircut wearable.
Start with your hair texture, face shape, workplace or school setting, and maintenance routine. Then choose the design placement. Most importantly, tell your barber exactly how low you want the taper, which guard range you prefer, where the design should sit, and whether your natural hairline should be preserved.
If you are building a personal haircut collection, save two or three reference photos and show them to your barber before the clippers start.
Explore more low taper haircut styles and variations
Name: Ryan Cole
Role: Lead Grooming Editor, TaperHaircutGuide.com
Bio angle: Men’s grooming/style content researcher — 4+ years covering barbering trends, hairstyling terminology, and men’s style content for US audience. Cross-checks every guide with practicing barbers before publishing.